How to Make and Ice a Caterpillar Cake

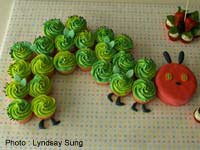
Small children love cakes that they can identify easily. This one is easier than most because instead of being one large cake, with all the risk of sinking or burning, you make twenty cup-cakes that are then set together to form a caterpillar’s face and body.
In this way you don’t even have to cut the cake, you can just take a small cake for each child’s goody bag.
This cake looks very impressive if you cover your cake board with black crepe paper or even black velvet and get some small sugar flowers to dot around the board, giving the impression that the caterpillar is browsing a field of flowers.
Ingredients
- 125 grams soft butter or margarine
- 125 grams caster sugar
- 125 grams self-raising flour, sifted
- 2 medium size eggs
For the Butter Icing
- 100g butter or margarine
- A tablespoon of hot water
- 150 grams icing sugar, sifted
To Decorate
- Green food colouring
- Chocolate buttons
- Jelly diamonds
- Red and black liquorice laces
- Twenty paper cake cases
- A cake board or tray
Method
Preheat oven to 180º Celsius or Gas Mark 4 and set out the baking cases on an ovenproof tray. Now beat the cake ingredients together with a wooden spoon in a large bowl, or put them in a food processor and process at high speed for about two minutes, or until smooth. If beating by hand, you may find you need to add a couple of drops of milk or vanilla essence, but the mixture shouldn’t be too soft, as you’re going to have to ice it, and softer cakes can be more difficult to work with as they tend to crumble while being iced.Now spoon the mixture into the cake cases, making sure they all have around the same amount, and level the tops slightly. Bake for between ten and fifteen minutes and allow the cakes to cool on a wire baking tray before using a sharp knife to cut flat any cake whose tops have risen during baking. Don’t try to ice too early, as butter icing will simply heat and become impossible to work with if the cakes are at all warm.
Decorating The Cake
When the cakes are ready, beat the butter and sugar together to make the butter icing, adding enough hot water, drop by drop, to make a smooth spreadable icing. Then colour it with a few drops of green food colour.Using a large palette knife, spread the icing over the tops of nineteen cakes, putting two or three rainbow jellies down the middle of each cake so that when they are lined up, they make a continuous line along the caterpillar’s body. If your icing starts to lift from the cakes, wash your palette knife clean, and dry it swiftly, allowing it to remain slightly warm, which will encourage the icing to slide off the knife onto the cake.
Turn the last cake on its side, so that it forms the face – use the chocolate buttons to make eyes and the red liquorice to make a big smile, with two pieces of black liquorice to serve as the antennae and two red chocolate buttons to make rosy cheeks. Put chocolate buttons down either side of the cake cases forming the body and cut the liquorice into short strips, bending it to make caterpillar legs that should stick out of each side of the cakes. Use a little melted chocolate from the remaining buttons to stick a jelly diamond to each leg to make a shoe.