How to Make a Dragon Cake

Friendly dragons play an important part in many stories for younger children. There are always a number of songs and characteristics associated with popular dragons-in books and films-and most children have their own favourites.
Dragons aren't always the best-behaved creatures; though they do have big personalities! Let your dragon's sense of fun loose with this cake design to help you create an original, mystical, creature and attract some magical happenings to your child's big day.
Follow the guidelines but be confident enough to add your own personal touches through the use of colours and expressions. The dragon cake is not difficult to make-but will create a dramatic centrepiece for the birthday party table-so, why not have a go at making this loveable dragon for your own little monster?Use two 1 litre bowl-shaped cakes for this design.
Ingredients for the Cakes
- 315g self-raising flour
- 155g plain flour
- 3 eggs, beaten
- 315g butter or margarine
- 315g superfine caster sugar
Cream the butter or margarine until soft, then, add the sugar and beat together until light and fluffy. Next, slowly add the combined, sieved flours. Whizz in a processor or beat with a wooden spoon then add the lightly beaten eggs.
Bake in greased, prepared pudding-basins, or bowl-shaped tins, in a preheated oven (160C) for approximately one and a quarter hours. (Tip: make a dip in the centre of the mix with the back of your spoon before baking.)
Once cooked, remove them from the oven and leave the cakes to stand for 10 minutes. Then, turn both out onto a wire rack to finish cooling.
Method
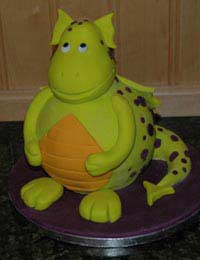
Cover a cake board of your choice with coloured sugar paste or ready-roll icing; purple looks especially good for dragons!You will need 1.6kg of rolled fondant/sugar paste in the main colour chosen for your dragon-bright green, yellow, whatever you fancy.Slice the tops of the cakes so that they are flat. Spread butter-cream between the two and then sandwich them together. A layer of butter-cream all over the outer surface of the cake will help to stick the coloured sugar paste needed to develop this creation.
Your cake will now look like an orb with a layer of undercoat...that’s fine.Make a tail from the main colour sugar paste and mould it to the bottom right part of the cake. It needs to be an inch or so away from the main body for effect. The tail can be tapered, with a forked end, jagged all the way along, or however your child would wish it to be. (Try to keep the basic outline rounded though as this is a more friendly shape.)
Roll a ball of sugar paste to make a short, round, neck. Mould this to the top of your cake, right in the centre.
Making the Head, Wings and Feet
As with all cake decorating, it’s a matter of personal taste! This is where it can all go pear shaped... Like moulding plasticine in your hands, work a handful of sugar paste (about 280g) into the shape of a pear to form the dragon’s head (widest part is the mouth end.)The wings can be bought (chocolate lattice pieces are useful for this) or you can make them yourself with sugar paste. Cut them from the rolled paste. They should be fairly short and stumpy-cut tworight-angled pieces and make a scallop pattern on the long outside edge; these are your dragon’s wings.
Use the handle of a teaspoon to mark grooves across the wing shapes.Similarly, for the dragon’s ears, mould 2 small pieces of sugar paste and cut to the desired shape.The forearms should be about the same length as the tail. Mould more sugar paste into two curved sausage shapes, then, make two cuts at one end to create 3 ‘fingers’ on each.
For the feet, mould paste into two shorter and thicker oval shapes and cut toes into the wider ends.
Covering
Use the bulk of your pre-rolled main colour for this. Carefully transfer it from the rolling surface to the cake and cover the entire cake, neck and tail. Smooth it down into shape. Make a cut where any pleats form as you do this then smooth the two pieces together.Make a bib shape for the dragon’s tummy with a different coloured sugar paste and stick this in the centre of the front.
Finishing Off
Use a small sharp knife to cut a mouth for your dragon-make it as wide as the head and definitely a big smile! Make two small indentations with the handle of a teaspoon for the dragon’s nostrils.Now you can attach the wings, head, ears, feet and arms! If you can get the forearms to come out from just below the neck and the fingers to rest on the contrasting colour of the dragon’s bib tummy, it will look particularly realistic.Make eyes with sugar paste, sweets, or an icing tube.Finish off by sticking smarties or other round sweets over the dragon’s back and apply your own finishing touches as you see fit!
- Making a Bundt Cake
- A Vegan Birthday Cake
- How to Make a Flower Pot Cake
- How to Make a Puppy Dog Birthday Cake
- How to Make an Animal Cake
- How to Make a Lego Cake
- How to Make a Football Cake
- How to Make a Butterfly Birthday Cake
- Great Sponge Cake Recipes
- How to Make Birthday Cupcakes
- Classic Birthday Cake Recipes
- How to Make a Balloon Cake
- Fruit Cake Recipes
- Birthday Cakes for a First Birthday

Re: Cake Ideas for Four to Seven Year Olds
Hi. I love site and wondered if you could help me ? I want to make an unusual but simple birthday cake for my nearly…
Re: A Vegan Birthday Cake
I have two grandsons who have severe egg allergies and I would say that this seems to be the best advice I have read on making egg free…
Re: Birthday Cakes for Toddlers
As long as it looks good and tastes like chocolate, kids aren't going to fuss too much about a birthday cake. They want to blow out…
Re: Unusual Birthday Cakes for Kids
@Katy I've made a similar cake to this and the children loved it!! I made my normal sponge cake mixure and separated it evenly…
Re: Unusual Birthday Cakes for Kids
Would like to make the sponge cake which is multicoloured - it is shown on the unusual birthday cakes for children page -…