How to Make a Flower Pot Cake

Bright colours and pretty flowers make this cake a little different; but very much a favourite. Thegirlie girls in your family and much-loved grannies, in particular, will feel very special if you make this for them.
Choose Your Method
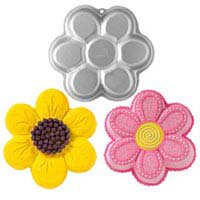
Moulded tins, available to hire or buy, take much of the guess work out of cake crafting and are the simplest way to make some shaped cakes. If you fancy creating your own, from start to finish, the flower pot cake is not a difficult one to try-do practise in advance though!If you go for the traditional flower pot shape, the use of one square cake and one round is the easiest way to achieve it.
Cake Board
Use a cake board that leaves a gap of at least 3cm all the way round the finished cake. A round one, covered with a soft pastel coloured sugar paste, makes a harmonious backdrop for this creation.The Cakes
Make one 20cm square cake and one 20cm round-Madeira sponge is ideal. Add a few drops of vanilla essence to the mix if you wish, or flavour with 2 tablespoons cocoa powder, first mixed to a smooth paste with 1 tablespoon of cold milk. Another tasty alternative is to add the juice and finely grated rind of either an orange or a lemon.Ingredients for the Square Cake
- 315g self-raising flour
- 155g plain flour
- 315g butter or margarine
- 315g superfine caster sugar
- 5 eggs
Ingredients for the Round Cake
- 250g self-raising flour
- 125g plain flour
- 250g butter or margarine
- 250g superfine caster sugar
- 4 eggs
Butter-cream Ingredients and Method
- 250g butter or soft margarine
- 350g icing sugar
- 2-4 tablespoons milk
Beat the butter or margarine with a wooden spoon, or in an electric mixer, until smooth and creamy. Slowly add the icing sugar, mixing thoroughly as you go. Next, add the milk, a few drops at a time, to get a thick but liquid consistency.
Cakes-Method
First, preheat the oven to 160C. Next, beat the butter (or margarine) to soften it and add the sugar.Mix together until light and fluffy. Add the eggs, one at a time, and beat the mixture well after each addition.Next, gradually combine the sieved flours with the butter/sugar/egg mixture, a little at a time and beat the mixture thoroughly between each addition. Now add any additional flavouring if you are using it.
Transfer the cake mix into your prepared cake tin. The square cake will need to be baked for approximately one hour, and the round cake for approximately 50 minutes. It is best to bake them in separate ovens-or separately in the same oven-otherwise opening and closing of the oven doorto move one cake can ruin the rising process of the other.
When cooked, remove from the oven and leave to stand for 10 minutes.Turn the cake out onto a wire rack to finish cooling while you prepare your fillings and othernecessities!
Shaping Your Flower Pot Cake
This is a matter of personal choice. As a guideline, try the following idea, you can always adapt it as you go along (with a serrated knife) or stick pieces back on with a dollop of butter cream if it goes wrong...Cut the cooled, square, cake into 4 equal square shapes. Spread a layer of butter cream between the squares and sandwich them together, one on top of the other; this will give your pot a good outline.
Before you do any decorating, hold the round cake on top of the column of squares to get an idea of the finished shape. (This cake looks great flat on a cake board-no need to reinforce it to keep it upright!)
Lie the square cake column flat on the cake board and cut into a flower pot shape by trimming the edges.When you are happy with the outline, cover both cakes with a layer of butter cream.
Next, cover the whole of both cakes with readymade, pre-coloured, sugar paste-try a brown/ orange colour for the pot part (squares) and a light green background sugar paste for the flower part (round cake.)
Use whichever colour sugar paste you choose for the pot to make a flower pot rim and mould the two cakes together, or, a contrasting colour to look like a ribbon.
Flowers
Sweets-stuck into the green sugar paste-look and taste good. It is also possible to buy readymade sugar flowers from cake shops; just arrange them as a bouquet bursting out from your flower pot.If you want to spend a little more time making flowers, ready-to-use tubes of icing are the simplest way of doing so. They come complete with nozzles and instructions and the finished effect looks very professional.
To finish off, you could use edible writing gel to write your personal message on the cake.A perfect way to tell someone you appreciate them.
- Making a Bundt Cake
- A Vegan Birthday Cake
- How to Make a Puppy Dog Birthday Cake
- How to Make an Animal Cake
- How to Make a Lego Cake
- How to Make a Dragon Cake
- How to Make a Football Cake
- How to Make a Butterfly Birthday Cake
- Great Sponge Cake Recipes
- How to Make Birthday Cupcakes
- Classic Birthday Cake Recipes
- How to Make a Balloon Cake
- Fruit Cake Recipes
- Birthday Cakes for a First Birthday

Re: Cake Ideas for Four to Seven Year Olds
Hi. I love site and wondered if you could help me ? I want to make an unusual but simple birthday cake for my nearly…
Re: A Vegan Birthday Cake
I have two grandsons who have severe egg allergies and I would say that this seems to be the best advice I have read on making egg free…
Re: Birthday Cakes for Toddlers
As long as it looks good and tastes like chocolate, kids aren't going to fuss too much about a birthday cake. They want to blow out…
Re: Unusual Birthday Cakes for Kids
@Katy I've made a similar cake to this and the children loved it!! I made my normal sponge cake mixure and separated it evenly…
Re: Unusual Birthday Cakes for Kids
Would like to make the sponge cake which is multicoloured - it is shown on the unusual birthday cakes for children page -…