How to Put Pictures on Cakes

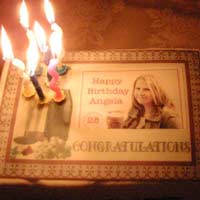
Adding pictures to birthday cakes is relatively simple to do. You actually have two options – you can call a local bakery and ask if they do a picture service, or you can buy the supplies and do it yourself.
If you want to learn how to put pictures on birthday cakes – you can by following the simple instructions below.
You may want to add a picture of the birthday boy or girl on the cake, or you could add their favourite cartoon/movie character. No matter which picture you decide to add to the birthday cake, there are a few supplies you will need first:
- Cake– Any flavour, type, shape or size will do, but obviously it will have to be big enough to accommodate the photograph that you choose. You can bake the cake yourself or buy one ready-made.
- Rice paper sheets – Rice paper is edible “paper” which you will be using to draw the pattern on.
- Non-toxic crayons – These are used to draw the picture onto the rice paper
- Icing – you can make your own icing and add natural colourings, or you can buy coloured icing from a cake makers or a supermarket.
- Pastry/pipe bags – you can use these to apply the icing to the rice paper. Make sure to buy different sized tips (smooth and star shaped) for the pastry bag to ensure the right amount of icing.
When you have chosen the picture to be added to the cake you then need to take the following steps to add that picture to the birthday cake:
- The cake you have chosen needs to be iced before the picture is added. You can do this yourself or buy a birthday cake that is already iced. However, if buying a cake, make sure that there is room for the picture to be added, and that the icing is fairly plain.
- Using the crayon, trace the picture onto the rice paper. This is done simply by putting the rice paper over the chosen picture and drawing what you see. Rice paper is very thin, so you shouldn't have difficulties tracing the picture.
- Once the picture has been traced onto the rice paper, cut it out and add it to the top of the birthday cake. The rice paper should dissolve, leaving the picture on the cake, but don’t worry if the rice paper doesn’t dissolve, as it is edible.
- Fill your pastry bag, either with homemade icing or ready-made icing, and start to trace the edges of the picture. A dark coloured icing works best for the outline of the picture as it helps the picture to stand out more. If you struggle to find a premade icing in a dark colour, try using fudge icing instead - this works just as well for an outline.
- After you have completed the outline, the next step is to fill in the rest of the design. It is generally easier to start with the smallest areas first that require more of a steady hand. Fill in the colours with a star shaped nozzle for the pipe bag. You may find you end up going over the original outline; don’t worry if this does happen, you will be doing the outline again in the next step.
- Once you have finished filling in the picture for the birthday cake, go over the outline again with your dark icing. This will really bring the picture to life and add the final touches.
You should now have a birthday cake that has an amazing picture on it. And, the best thing is you did it all yourself!
Picture birthday cakes add a little something special to a birthday party – you could have everybody asking where you bought the picture birthday cake from – imagine their surprise when you tell them you did it all by yourself!
- The 'Un-christmassy' Birthday Cake for December Kids
- Birthday Cakes for Twins
- Sophisticated Birthday Cakes for Teenagers
- Using Mouldable Icing to Create Specialist Cake Figures
- How to Make and Ice a Caterpillar Cake
- Unusual Birthday Cakes for Kids
- Birthday Cakes for Eight to Twelve Year Olds
- Cake Ideas for Four to Seven Year Olds
- Birthday Cakes for Toddlers
- Toppings for Children's Birthday Cakes
- Birthday Cake Equipment You Will Need
- Buy or Bake Your Child's Birthday Cake?
- Character Kids' Birthday Cakes
- Learn How to Decorate Cakes
- Candles for the Birthday Cake


Re: Cake Ideas for Four to Seven Year Olds
Hi. I love site and wondered if you could help me ? I want to make an unusual but simple birthday cake for my nearly…
Re: A Vegan Birthday Cake
I have two grandsons who have severe egg allergies and I would say that this seems to be the best advice I have read on making egg free…
Re: Birthday Cakes for Toddlers
As long as it looks good and tastes like chocolate, kids aren't going to fuss too much about a birthday cake. They want to blow out…
Re: Unusual Birthday Cakes for Kids
@Katy I've made a similar cake to this and the children loved it!! I made my normal sponge cake mixure and separated it evenly…
Re: Unusual Birthday Cakes for Kids
Would like to make the sponge cake which is multicoloured - it is shown on the unusual birthday cakes for children page -…